前言:
Java中的同步类ReentrantLock 是基于AbstractQueuedSynchronizer(简称为AQS )实现的。
今天从源码来了解下ReentrantLock 中非公平锁的加锁和释放锁(ReentrantLock 中支持公平锁和非公平锁,默认是非公平锁的,但可以通过创建ReentrantLock 对象时传入参数指定使用公平锁)。
在了解ReentrantLock 前,需要对AQS 有一定的了解,否则在学习时会比较困难的,并且在通过源码学习ReentrantLock 时也会穿插着讲解AQS 内容。
AQS扫荡: 1.0、AQS中state变量 AQS中提供了一个int类型的state 变量,并且state 变量被volatile 修饰,表示state 变量的读写操作 可以保证原子性;并且AQS还提供了针对state 变量的读写方法,以及使用CAS算法更新state 变量的方法。 AQS使用state 变量这个状态变量来实现同步状态。
①、源码展示
1 2 3 4 5 6 7 8 9 10 11 12 13 14 15 16 17 18 19 20 21 22 23 24 25 26 27 28 29 30 31 32 private volatile int state;protected final int getState () return state; } protected final void setState (int newState) state = newState; } protected final boolean compareAndSetState (int expect, int update) return unsafe.compareAndSwapInt(this , stateOffset, expect, update); }
1.1、state同步状态的竞争 多个线程同时竞争AQS的state同步状态 ,在同一时刻只能有一个线程获取到同步状态(获取到锁),那其它没获取到锁的线程该怎么办呢
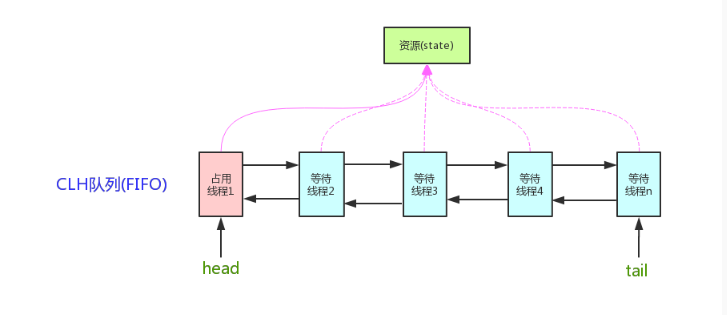
它们会进去到一个同步队列中,在队列中等待同步锁的释放;
这个同步队列是一个基于链表的双向队列 Node节点 ,那么AQS中节点是怎么实现的呢
①、Node节点:
AQS中自己实现了一个内部Node节点类,Node节点类中定义了一些属性,下面来简单说说属性的意思:
1
2
3
4
5
6
7
8
9
10
11
12
13
14
15
16
17
18
19
20
21
22
23
24
25
26
27
28
29
30
31
32
33
34
35
36
37
38
39
40
41
42
43
44
45
46
47
48
49
50
51
52
53
54
55
56
57
58
59
60
61
62
63
64
65
66
67
68
69
70
71
72
73
74
75
76
77
78
79
80
81
82
83
84
85
static final class Node static final Node SHARED = new Node(); static final Node EXCLUSIVE = null ; static final int CANCELLED = 1 ; static final int SIGNAL = -1 ; static final int CONDITION = -2 ; static final int PROPAGATE = -3 ; volatile int waitStatus; volatile Node prev; volatile Node next; volatile Thread thread; Node nextWaiter; final boolean isShared () return nextWaiter == SHARED; } final Node predecessor () throws NullPointerException Node p = prev; if (p == null ) throw new NullPointerException(); else return p; } Node() { } Node(Thread thread, Node mode) { this .nextWaiter = mode; this .thread = thread; } Node(Thread thread, int waitStatus) { this .waitStatus = waitStatus; this .thread = thread; } }
②、同步队列结构图(双向队列):
1.2、图解AQS原理 通过前面两点,可以了解到AQS的原理到底是什么了,总结为一句话:AQS使用一个Volatile的int类型的成员变量来表示同步状态,通过内置的FIFO队列来完成资源获取的排队工作,通过CAS完成对State值的修改。
然后再来一张图,使得理解更加深刻:
图片来源: Java技术之AQS详解
好了,AQS 暂时可以先了解到这里了,知道这些后,在后面了解ReentrantLock 时就会变的容易些,并且后面通过源码学习ReentrantLock 时,由于会使用到AQS的模版方法,所以也会讲解到AQS的内容。
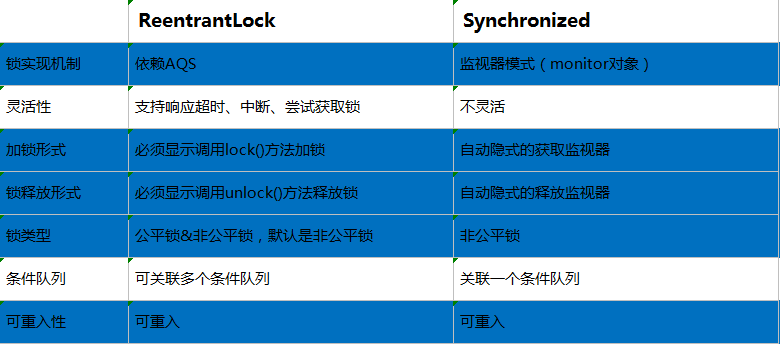
剑指 2.0、ReentrantLock vs Synchronized 在了解ReentrantLock 之前,先将ReentrantLock 与Synchronized 进行比较下,这样可以更加了解ReentrantLock 的特性,也有助于下面源码的阅读;
2.1、ReentrantLock的公平锁与非公平锁 创建一个ReentrantLock 对象,在创建对象时,如果不指定公平锁的话,默认是非公平锁;
①、简单了解下什么是公平锁,什么是非公平锁?
公平锁:按照申请同步锁的顺序来获取锁;
非公平锁:不会按照申请锁的顺序获取锁,存在锁的抢占;
注:后面会通过源码了解下非公平锁和公平锁是怎样获取锁的。
②、源码如下:
1 2 3 4 5 6 7 8 9 10 11 12 13 14 15 ReentrantLock lock = new ReentrantLock(); public ReentrantLock () sync = new NonfairSync(); } ReentrantLock lock = new ReentrantLock(true ); public ReentrantLock (boolean fair) sync = fair ? new FairSync() : new NonfairSync(); }
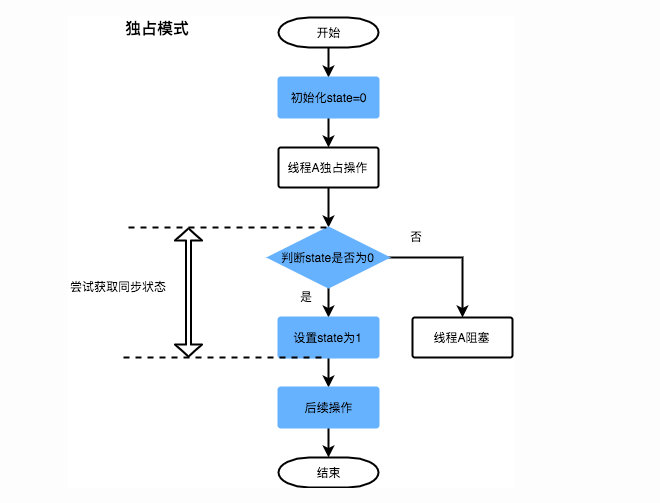
2.2、通过源码看下非公平锁 的加锁机制:(独占模式) ①、开始先通过一个简单流程图来看下独占模式下加锁的流程:
图片来源:美团技术团队
②、源码分析:加锁时首先使用CAS算法尝试将state状态变量设置为1,设置成功后,表示当前线程获取到了锁,然后将独占锁的拥有者设置为当前线程;如果CAS设置不成功,则进入Acquire方法进行后续处理。
1
2
3
4
5
6
7
8
9
final void lock () if (compareAndSetState(0 , 1 )) setExclusiveOwnerThread(Thread.currentThread()); else acquire(1 ); }
③、探究下acquire(1) 方法里面是什么呢模版方法 :
1
2
3
4
5
6
7
8
9
10
11
12
13
14
15
public final void acquire (int arg) if (!tryAcquire(arg) && acquireQueued(addWaiter(Node.EXCLUSIVE), arg)) selfInterrupt(); }
1) 、tryAcquire(arg) 方法源码解读:NonfairSync 非公平锁中重写了AQS的tryAcquire()方法
1
2
3
4
5
6
7
8
9
10
11
12
13
14
15
16
17
18
19
20
21
22
23
24
25
26
final boolean nonfairTryAcquire (int acquires) final Thread current = Thread.currentThread(); int c = getState(); if (c == 0 ) { if (compareAndSetState(0 , acquires)) { setExclusiveOwnerThread(current); return true ; } } else if (current == getExclusiveOwnerThread()) { int nextc = c + acquires; if (nextc < 0 ) throw new Error("Maximum lock count exceeded" ); setState(nextc); return true ; } return false ; }
2) 、addWaiter( Node.EXCLUSIVE ) :创建一个同步队列Node节点,同时绑定节点的模式为独占模式,并且将创建的节点插入到同步队列尾部;addWaiter( ) 方法是AQS提供方法。
1
2
3
4
5
6
7
8
9
10
11
12
13
14
15
16
17
18
19
20
private Node addWaiter (Node mode) Node node = new Node(Thread.currentThread(), mode); Node pred = tail; if (pred != null ) { node.prev = pred; if (compareAndSetTail(pred, node)) { pred.next = node; return node; } } enq(node); return node; }
3) 、说完addWaiter( Node.EXCLUSIVE )方法,接下来说下acquireQueued() 方法,它是怎样使addWaiter()创建的节点中的线程获取到state同步锁的。(这个方法也是AQS提供的)
源码走起:
1
2
3
4
5
6
7
8
9
10
11
12
13
14
15
16
17
18
19
20
21
22
23
24
25
26
27
28
29
30
31
32
33
34
35
36
37
38
39
40
41
42
43
44
45
46
47
48
49
final boolean acquireQueued (final Node node, int arg) boolean failed = true ; try { boolean interrupted = false ; for (;;) { final Node p = node.predecessor(); if (p == head && tryAcquire(arg)) { setHead(node); p.next = null ; failed = false ; return interrupted; } if (shouldParkAfterFailedAcquire(p, node) && parkAndCheckInterrupt()) interrupted = true ; } } finally { if (failed) cancelAcquire(node); } }
4) 、最后说下 selfInterrupt() 方法, 这个方法就是将当前线程进行中断:
1
2
3
4
static void selfInterrupt () Thread.currentThread().interrupt(); }
2.3、公平锁与非公平锁在加锁时的区别: ①、公平锁 FairSync 的加锁 lock() 加锁方法:
1
2
3
final void lock () acquire(1 ); }
②、非公平锁 NonfairSync 的加锁 lock() 加锁方法:上面讲解源码的时候有提到哟,还有印象吗,没印象的话也没关系,不要哭
1
2
3
4
5
6
7
8
9
10
11
12
final void lock () if (compareAndSetState(0 , 1 )) setExclusiveOwnerThread(Thread.currentThread()); else acquire(1 ); }
③、除了上面那处不同之外,还有别的地方吗;别急,再看看 acquire(1) 方法是否一样呢?
1
2
3
4
5
public final void acquire (int arg) if (!tryAcquire(arg) && acquireQueued(addWaiter(Node.EXCLUSIVE), arg)) selfInterrupt(); }
诶呀,方法点进去都是一样的呀,可不嘛,都是调用的AQS提供的 acquire(1) 方法;但是别着急,上面在讲解非公平锁加锁时,有提到的 tryAcquire(arg) 方法在AQS的不同子孙类中都有各自的实现的。现在打开公平锁的 tryAcquire(arg) 方法看看其源码与非公平锁有什么区别:
1
2
3
4
5
6
7
8
9
10
11
12
13
14
15
16
17
18
19
20
21
22
23
24
25
26
27
28
29
30
protected final boolean tryAcquire (int acquires) final Thread current = Thread.currentThread(); int c = getState(); if (c == 0 ) { if (!hasQueuedPredecessors() && compareAndSetState(0 , acquires)) { setExclusiveOwnerThread(current); return true ; } } else if (current == getExclusiveOwnerThread()) { int nextc = c + acquires; if (nextc < 0 ) throw new Error("Maximum lock count exceeded" ); setState(nextc); return true ; } return false ; }
松口气,从中午一直写到下午快四点了,先让我歇口气,快累成狗了;本文还剩下释放锁部分没写呢,歇口气,喝口水继续
注意:ReentrantLock在释放锁的时候,并不区分公平锁和非公平锁 。
2.4、通过源码看下释放锁机制:(独占模式) ①、unlock() 释放锁的方法:
1
2
3
4
public void unlock () sync.release(1 ); }
②、release( int arg ) 方法解析:(此方法是AQS提供的)
1
2
3
4
5
6
7
8
9
10
11
public final boolean release (int arg) if (tryRelease(arg)) { Node h = head; if (h != null && h.waitStatus != 0 ) unparkSuccessor(h); return true ; } return false ; }
注意:这里的判断条件为什么是h != null && h.waitStatus != 0?
h == null Head还没初始化。初始情况下,head == null,第一个节点入队,Head会被初始化一个虚拟节点。所以说,这里如果还没来得及入队,就会出现head == null 的情况。
h != null && waitStatus == 0 表明后继节点对应的线程仍在运行中,不需要唤醒。
h != null && waitStatus < 0 表明后继节点可能被阻塞了,需要唤醒。
③、然后再来看看tryRelease(arg) 方法:
1
2
3
4
5
6
7
8
9
10
11
12
13
14
15
protected final boolean tryRelease (int releases) int c = getState() - releases; if (Thread.currentThread() != getExclusiveOwnerThread()) throw new IllegalMonitorStateException(); boolean free = false ; if (c == 0 ) { free = true ; setExclusiveOwnerThread(null ); } setState(c); return free; }
④、最后看看unparkSuccessor(Node node) 方法:
1
2
3
4
5
6
7
8
9
10
11
12
13
14
15
16
17
18
19
private void unparkSuccessor (Node node) int ws = node.waitStatus; if (ws < 0 ) compareAndSetWaitStatus(node, ws, 0 ); Node s = node.next; if (s == null || s.waitStatus > 0 ) { s = null ; for (Node t = tail; t != null && t != node; t = t.prev) if (t.waitStatus <= 0 ) s = t; } if (s != null ) LockSupport.unpark(s.thread); }
注意:为什么要从后往前找第一个非Cancelled的节点呢?原因如下:
由于之前加锁时的addWaiter( )方法的原因;
1
2
3
4
5
6
7
8
9
10
11
12
13
14
15
16
17
18
19
20
private Node addWaiter (Node mode) Node node = new Node(Thread.currentThread(), mode); Node pred = tail; if (pred != null ) { node.prev = pred; if (compareAndSetTail(pred, node)) { pred.next = node; return node; } } enq(node); return node; }
从这里可以看到,节点入队并不是原子操作,也就是说,node.prev = pred ; compareAndSetTail( pred, node ) 这两个地方可以看作Tail入队的原子操作,但是此时 pred.next = node; 还没执行,如果这个时候执行了unparkSuccessor方法,就没办法从前往后找了,所以需要从后往前找。还有一点原因,在产生CANCELLED状态节点的时候,先断开的是Next指针,Prev指针并未断开 ,因此也是必须要从后往前遍历才能够遍历完全部的Node。
end! 长吸一口气,终于本文算是写完了,最后再看看有没有错别字,以及排排版。
后续还会出一篇结合CountDownLatch 源码学习共享锁(共享模式)的文章。
谢谢大家阅读,鉴于本人水平有限,如有问题敬请提出。
参考资料: 1、从ReentrantLock的实现看AQS的原理及应用 2、Java技术之AQS详解


 ReentrantLock源码:

 acquire(1) 方法是AQS提供的 模版方法 :
 , 嘿嘿,我都准备好了
 。 源码奉上:
。

